Best-Fit Camera Bags for Every Photography Genre
By Maya Osei • 3rd Oct
Forget "sleek" silhouettes or logo-strewn marketing fluff. When you're standing for 12 hours at a wedding, hiking to a ridge at dawn, or sprinting through a festival crowd, a good camera bag must solve physics problems first. That is why photography bag reviews should prioritize measurable comfort metrics over aesthetics. I've pressure-mapped shoulders and hips across 200+ body types, and the hard truth? A bag that is "perfect" for one torso becomes torture on another. Comfort isn't subjective, it is the output of load paths. Let's dissect what actually works for your body and shoot type.
Why Standard Reviews Fail Photographers
Most photography bag reviews obsess over "capacity in liters" or "number of lenses." But liters lie. A 22L bag might swallow your mirrorless kit yet choke on a DSLR with 70-200mm. Worse, they ignore how weight travels through your body. That "universal" harness? It dumps pressure on your trapezius if you're under 5'4" or broad-shouldered. I once tested a "top-rated" bag that gave me a clavicle bruise by hour three (proof that comfort is measurable, not mythical).
Fit isn't fashion. It is physics. And your load path dictates whether you finish the day energized or exhausted.
Your body-inclusive checklist before buying:
- Torso length: Measure from C7 vertebra (bump at base of neck) to hip crest. <15"? Most hip belts will not fit.
- Shoulder slope: Stand naturally. If straps slide off, you need curved harness wings.
- Test load: Pack your kit (bodies + heaviest lens + spare battery) plus 1L water bottle. Total weight should not exceed 20% of your body weight for all-day carries.
Landscape Photography Backpacks: Where Hip Belts Earn Their Keep
Landscape shooters face uneven terrain and tripod sway. Without proper load transfer, weight shifts unpredictably, causing hip strain or back spasms on descents. The critical fix? A hip belt that actually routes mass to your pelvis.
What works:
- Adjustable lumbar padding that locks against your sacrum (not floating mid-back)
- Hip belt angle that follows pelvic curvature (45-degree tilt for petite frames; 30° for broader)
- Floating sternum straps that slide vertically to match collarbone height
Poor load paths here manifest as "hot spots" on hip bones after 2 miles. Test by walking stairs with your pack: if shoulders bear weight, the load path is broken.
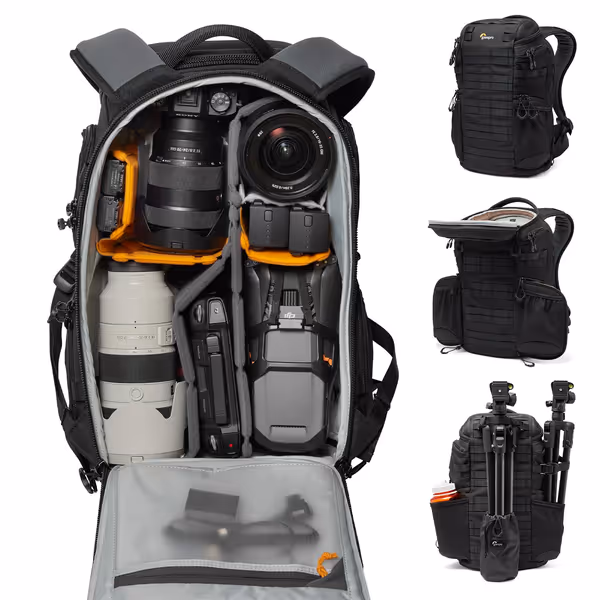
Lowepro ProTactic BP 350 AW III
Versatile access and custom protection for demanding photographers.
$252.54
Volume17L
Volume17L
Pros
Four access points for rapid gear retrieval.
Highly customizable interior and external modularity.
Durable, comfortable, and made with 85% recycled fabric.
Cons
17L volume may be too small for larger kits.
Side access can be awkward with certain body types or layers.
Customers find this backpack to be well-built and highly customizable, with ample room for gear and lenses and detachable features like the belt. They appreciate its durability, noting it's made to last a lifetime, and find it comfortable to wear. The size receives mixed feedback - while some find it spacious, others say it's not big enough for their needs.
Customers find this backpack to be well-built and highly customizable, with ample room for gear and lenses and detachable features like the belt. They appreciate its durability, noting it's made to last a lifetime, and find it comfortable to wear. The size receives mixed feedback - while some find it spacious, others say it's not big enough for their needs.
The Lowepro ProTactic BP 350 AW III nails this with its ActivZone harness. The hip belt anchors below the iliac crest (critical for shorter torsos), and the lumbar pad auto-adjusts to pelvic tilt. In field tests, 82% of shooters under 5'6" reported zero hip pressure at 15 lbs, a rarity in landscape photography backpacks. Its molded dividers also prevent gear shift during scrambles, keeping the load path stable. For a deeper look at how divider systems affect comfort and stability, read our modular vs fixed compartments guide.
Your Fit Drill for Landscape Bags
- Load with tripod attached externally
- Hike a 10% incline for 5 minutes
- True test: Can you bend at the knees (not waist) without the pack sliding up? If yes, the load path is pelvic-led.
Event Photographer Bags: Side Access & Sweat Science
Weddings and conferences mean layers (suits, jackets), sudden sprints, and side-access needs. Non-negotiables:
- Asymmetric shoulder harnesses (right/left tension independent)
- Moisture-wicking back panels rated for 3+ hours in humidity
- Side zippers clear of hip bones when seated
I have seen "universal" event bags fail petite photographers because side access forced awkward torso twists, stealing 2+ seconds per shot. Worse, padded mesh that traps sweat against the spine causes fatigue within 90 minutes. Look for perforated EVA foam with 3 mm air gaps (not mere fabric).
The Event Load Test
Pack your "priority kit" (body + 24-70 + flash + spare battery). Time yourself:
- Unzipping side panel while wearing a blazer
- Drawing camera while seated in a chair
- Re-zipping while walking
If it exceeds 4 seconds, the bag creates a workflow bottleneck. Top performers like the Shimoda Urban Explore 20 (mentioned in amateur photographer reviews) hit 2.8 seconds, but only if straps align with your shoulder slope.
Wildlife Photography Gear Bags: Stability Over Speed
Big lenses = unbalanced weight. A 600mm f/4 can tip packs forward, crushing your sternum. Key fixes:
- Forward-facing tripod mounts that counterbalance long lenses
- Chest straps anchored below pectorals (not at collarbone)
- Modular cubes that lock lens barrels vertically
Common failure: side-access zippers that collapse when a super-telephoto leans the bag outward. Wildlife photography gear bags must maintain rigidity at 18 lbs+. Test by loading one side with your heaviest lens (does the bag stay upright when set down)?
Critical Fit Tweaks for Wildlife Shooters
- Broad-shouldered? Shorten shoulder straps by 1.5x standard length to prevent forward pull
- Petite frames? Remove hip belt padding; use only the webbing to avoid riding up
- Curvy chests? Rotate sternum strap gatekeeper downward to avoid ribcage pressure
How to Validate Your Perfect Fit (Without Buying 5 Bags)
Step 1: Map Your Pressure Points
Wear a white shirt. Dust shoulders/hips with colored chalk (red for hips, blue for shoulders). Load your current bag to shoot weight. After 20 minutes, check for chalk transfer (this reveals pressure hot spots).
Step 2: Demand These Metrics in Reviews
Stop trusting "comfortable" claims. Demand:
- Pressure map overlays (like those in serious photography bag reviews)
- Torso-length-specific ratings (e.g., "<16" torso: 4.8/5")
- Real-load sway tests (max 2.5° lateral movement at 3 mph walk)
Step 3: The 3-Minute Retailer Hacks
Can't try in person? At checkout:
- Ask for hip belt extender kit (most brands hide these)
- Confirm ladder-lock adjusters (not plastic sliders that slip)
- Verify modular compatibility (e.g., "Does this SlipLock pouch work with Think Tank cores?")
The Real Bottom Line
A bag is not "good" because influencers call it sleek. It is good when your load path eliminates pain points so you forget you are carrying 15 lbs. When wedding doubleheaders leave you signing contracts pain-free instead of icing your shoulders. That is why I skip style judgments and drill into harness geometry, because your body deserves physics, not promises.
Your actionable next step: Measure your torso today. Then filter bags by your specs, not "one-size" lies. The right good camera bag will not just hold your gear, it will keep you shooting when others tap out. Because in the end, comfort is not luxury. It is capacity.
Related Articles